WordPress does some pretty amazing things out of the box. It handles content management as well as any other open source solution out there – and better than many commercial solutions as well. One of the best attributes about WordPress is its ease of use. It’s easy because there’s not a significant amount of bloat with endless bells and whistles that increase the learning curve.
On the flip side, for some, you might find WordPress a little… well, light. It does a lot, but it’s not quite enough. If you find yourself hacking WordPress to do the things you wish it would do, then the chances are high that this article is for you.
Fair warning. This article is technical in nature. We’ll be going over some deep development concepts. If you find yourself excited about the content but bewildered in trying to understand or implement these techniques, give us a call.
If you want to follow along at home, we’ve provided the full source code here.
Custom Post Types
WordPress gives the developers a very simple and straight forward way to extend the standard two data types (posts and pages) into an endless array for your custom needs. A shop like ours would need a project post type. Our friends over at North Hills would need a locations post type.
Quick point. Spinning off custom post types is a great idea for content that is intrinsically different than either posts or pages. There could be a case where you would want press releases to live in their own type. But more often than not, the press releases would be a post and categorized as a press release. Or you may want to create a post type for landing pages. It may very well belong as a custom type, but it likely could also exist as a WordPress Page.
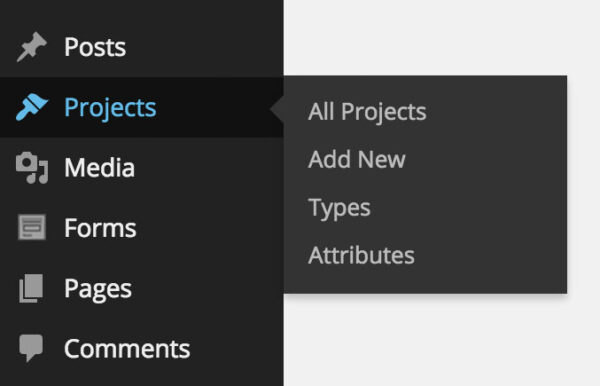
For the sake of this article, we’re going to use a real world application of creating a project post type to store samples of work. We’ll register the post type, add some meta data to it, include additional information in the WordPress Administration screens, and create new custom taxonomies to supplement.
Registering the Post Type
To get started, we’ll need some code to register the post type. We’re going to go with an object-oriented approach because we’ll be spinning this post type off with some added functionality later that is much more efficient through an object model. To start, we’re going to create the function that registers the post type.
function create_post_type() {
	$labels = array(
		'name'               => 'Projects',
		'singular_name'      => 'Project',
		'menu_name'          => 'Projects',
		'name_admin_bar'     => 'Project',
		'add_new'            => 'Add New',
		'add_new_item'       => 'Add New Project',
		'new_item'           => 'New Project',
		'edit_item'          => 'Edit Project',
		'view_item'          => 'View Project',
		'all_items'          => 'All Projects',
		'search_items'       => 'Search Projects',
		'parent_item_colon'  => 'Parent Project',
		'not_found'          => 'No Projects Found',
		'not_found_in_trash' => 'No Projects Found in Trash'
	);

	$args = array(
		'labels'              => $labels,
		'public'              => true,
		'exclude_from_search' => false,
		'publicly_queryable'  => true,
		'show_ui'             => true,
		'show_in_nav_menus'   => true,
		'show_in_menu'        => true,
		'show_in_admin_bar'   => true,
		'menu_position'       => 5,
		'menu_icon'           => 'dashicons-admin-appearance',
		'capability_type'     => 'post',
		'hierarchical'        => false,
		'supports'            => array( 'title', 'editor', 'author', 'thumbnail', 'excerpt', 'comments' ),
		'has_archive'         => true,
		'rewrite'             => array( 'slug' => 'projects' ),
		'query_var'           => true
	);

	register_post_type( 'o3_project', $args );
}
Not too much mysterious here. We’re calling the create_post_type function which registers our post type. We’re giving the type some labels for backend identification and giving it a list of specifications in what it can do. For a full list of reference for each of these variables, take a look at the WordPress Codex, but we’ll hit on a few key items.
Labels. For brevity, we created a labels array and simply passed it to the arguments array. WordPress gives us the opportunity to identify a slew of labels for singular, plural, and other purposes.
Public. This setting is a parent of sorts for a few of the other settings that appear later in the list. The default value for the public attribute is false. The value of public is passed to the following other attributes when they are not explicitly defined: exclude_from_search, publicly_queryable, show_in_nav_menus, and show_ui.
Exclude From Search. The default setting here is the opposite of the public attribute. If your post type is public, then it is included in WordPress powered search results (note, this has no implication on SEO). There’s a chance you would want the post type to be public but not appear in search results. If that’s the case, you would set this attribute to true.
Publicly Queryable. This attribute is exclusively for front end queries and has no real back end implications. The default value is the same as the public attribute. Note, when set to false, you would not be able to view or preview the post type on the front end. For example, if you wanted to create a post type that would populate a personnel page with a list of everyone’s name, title, and bio but didn’t want that person to have their own URL on the site, you would set publicly_queryable to false.
Show UI. Most of the time, you’ll want show_ui set to true. The default value here pulls from the public attribute but can be overridden. When set to false, you won’t have a UI element on the WordPress administration screen available to you. A practical reason why you would want this set to false is if you had a post type that merely managed data. For example, you may want an events post type that has a recurring attribute. When you save an event, new posts of a different type would be created to handle each event occurrence. You would only want the UI to show the primary event post type and not the event occurrence meta data.
Show In Nav Menus. Pretty simple and straightforward. If you don’t want this post type to appear in the default WordPress Menu functionality, set this to false. It takes the value of public as default.
Show In Menu. You can modify the position of the post type on the back end. When set to true, the post type defaults as a top level menu (on the same hierarchical level as Posts or Pages). If false, it won’t show at all. You can use a string value here to explicitly nest the post type into a top level’s sub menu. The type of string you would provide is tools.php which would place the post type as a nested element under Tools. It derives its default value from show_ui. Note that show_ui must be set to true to control this attribute.
Show In Admin Bar. Pretty self explanatory. If you want UI elements added to the WordPress admin bar, set this to true.
Menu Position. The default value of null will place the menu (at the top level and if not overridden using show_in_menu) below Comments on the backend. You can control this further by specifying an integer value corresponding to default WordPress menu placements. A value of 5 will place the post type under Posts, 10 under Media, 15 under Links, and 20 under Pages. For a full list of these values, check out the WordPress Codex.
Menu Icon. You can pass a URL to this attribute but you could also simply use a name of an icon from Dashicons to give you a solution quickly. Supplying the attribute ‘dashicons-admin-appearance’ would give you a paint brush. For a full list of Dashicons available to you, check out this handy resource. As a default, you will get the thumbtack icon that is used for Posts.
Capability Type. This attribute quickly gets into some advanced user role segmenting concepts. Essentially, assigning post to this attribute generates a capability structure that exactly mimics how access to Posts works. Using this value, subscribers would not be able to access this post type whereas Authors, Editors, and Administrators would. Using page here would limit access to just Editors and Administrators. You can define a more granular structure using capability_type and capabilities attributes to the argument list. Note, we did not use the capabilities attribute in this example because we’re not explicitly defining a custom capability structure to be used with this post type. This is an advanced concept and one for a completely different article.
Hierarchical. This is basically the difference between a Post and a Page. When set to true, a parent post can be identified on a per-post basis (basically, Pages). When false, it behaves as a Post.
Supports. There’s a whole bunch of default functionality attached to each new post type. This array tells WordPress which one of those to include by default. There may be an instance where you don’t want the editor on your post type. Removing that from the array will remove the editor box as well. Eligible items for the array include:
- title
- editor
- author
- thumbnail
- excerpt
- trackbacks
- custom-fields
- comments
- revisions
- page-attributes
- post-formats
Has Archive. When set to true, WordPress creates a hierarchical structure for the post type. So accessing /projects/ would give us the standard archive.php view of the data. You can template out a variant of archive.php for this specific archive by creating a new file in your theme system called archive-o3_project.php. You can control the default behavior at a more granular level by spinning it off from your primary archive.php.
Rewrite. The rewrite option allows you to form a URL structure for the post type. In this instance, our URL would be http://www.WeAreO3.com/projects/{slug} where the slug is the portion assigned by each post when they’re created (normally, based on the title of the post). There’s a second variable that can be assigned inside the rewrite array. if you add with_front => false (it defaults to true), it will not use the identified front half of the URL which is set in Settings -> Permalinks. For example, if your default WordPress permalink structure is /blog/%postname%/, your custom post type will automatically be /blog/projects/%postname%/. That’s not a good outcome so you would want to set with_front to false.
Query Var. This attribute controls where you can use a PHP query variable to retrieve the post type. The default is true and renders with the permalink structure (when set). You can use a string instead of a variable and control the key portion of the query variable with the string’s value.
Extending the Post Type with a Taxonomy (Or Two)
Out of the box, WordPress Posts have Categories and Tags attached to it to allow you to appropriately place content in these buckets. By default, new post types don’t have any taxonomies attached to it. You may not want to categorize or tag your post type, but if you did, we’d need to register some new ones. There are two variants of taxonomies. One that behaves like Categories (the checklist to the right of the posts) and one like Tags which has no hierarchical structure to it. They behave on the backend pretty much in the same way (the only discernable difference being that Categories can have children where Tags cannot), but how they’re presented in the Administration screen varies quite wildly. We’ll register two taxonomies to give us one of each type.
function create_taxonomies() {

	// Add new taxonomy, make it hierarchical (like categories)
	$labels = array(
		'name'              => 'Types',
		'singular_name'     => 'Type',
		'search_items'      => 'Search Types',
		'all_items'         => 'All Types',
		'parent_item'       => 'Parent Type',
		'parent_item_colon' => 'Parent Type:',
		'edit_item'         => 'Edit Type',
		'update_item'       => 'Update Type',
		'add_new_item'      => 'Add New Type',
		'new_item_name'     => 'New Type Name',
		'menu_name'         => 'Types',
	);

	$args = array(
		'hierarchical'      => true,
		'labels'            => $labels,
		'show_ui'           => true,
		'show_admin_column' => true,
		'query_var'         => true,
		'rewrite'           => array( 'slug' => 'type' ),
	);

	register_taxonomy('o3_project_type',array('o3_project'),$args);

	// Add new taxonomy, NOT hierarchical (like tags)
	$labels = array(
		'name'                       => 'Attributes',
		'singular_name'              => 'Attribute',
		'search_items'               => 'Attributes',
		'popular_items'              => 'Popular Attributes',
		'all_items'                  => 'All Attributes',
		'parent_item'                => null,
		'parent_item_colon'          => null,
		'edit_item'                  => 'Edit Attribute',
		'update_item'                => 'Update Attribute',
		'add_new_item'               => 'Add New Attribute',
		'new_item_name'              => 'New Attribute Name',
		'separate_items_with_commas' => 'Separate Attributes with commas',
		'add_or_remove_items'        => 'Add or remove Attributes',
		'choose_from_most_used'      => 'Choose from most used Attributes',
		'not_found'                  => 'No Attributes found',
		'menu_name'                  => 'Attributes',
	);

	$args = array(
		'hierarchical'          => false,
		'labels'                => $labels,
		'show_ui'               => true,
		'show_admin_column'     => true,
		'update_count_callback' => '_update_post_term_count',
		'query_var'             => true,
		'rewrite'               => array( 'slug' => 'attribute' ),
	);

	register_taxonomy('o3_project_attribute','o3_project',$args);
}

Alright. Now we have two new taxonomies attached to the new post type. The register_taxonomy function takes 3 arguments. The first is the taxonomy name, the second is an array or string of post types, and the third is the arguments defined above.
One quick note on our prefixing. Our post type and taxonomies are all prefixed with o3_. This is by design. We don’t want future plugins to interrupt our infrastructure so we simply prefix. The prefix is completely up to you.
So we’ve got a new post type and two new taxonomies attached to it. This essentially replicates the default Posts behavior of WordPress. This is all good stuff, but let’s dig a little deeper to make it more integrated.
Enhancing the Experience with Meta Data
Creating additional fields available to the author in the WordPress Administration screen can be a bit tricky – but abundantly useful. Where WordPress underperforms its competitors is precisely in this area. There’s no user interface to allow you to define additional pieces of information on a per post basis. Make no mistake, WordPress fully supports this behavior, but it’s more of a developer tool than it is an out-of-the-box tool. Which makes sense. There’s an endless number of combinations in regards to additional fields one could need. Even if WordPress provided a slick backend interface to allow a non-technical user to define these fields, there’s no real seamless way to display that information on the front end without a developer putting their hands on it and making it so.
Fortunately, this is where Advanced Custom Fields comes in. ACF is a wonderful plugin that gives developers this interface and a full array of templating functions to pull the data on the front end. This article won’t detail how to do that, but ACF gives ample documentation to get you started and working in the ACF environment.
Using ACF, you can define new fields and conditionally attach them to content throughout the site. For example, we could create a timeframe meta field that would collect how long a particular project took. We could add additional fields for awards won or create fields to represent a list of references for any given project.
Using ACF really opens up the hood for what’s possible in WordPress.
Adding Columns to the Administration Screen
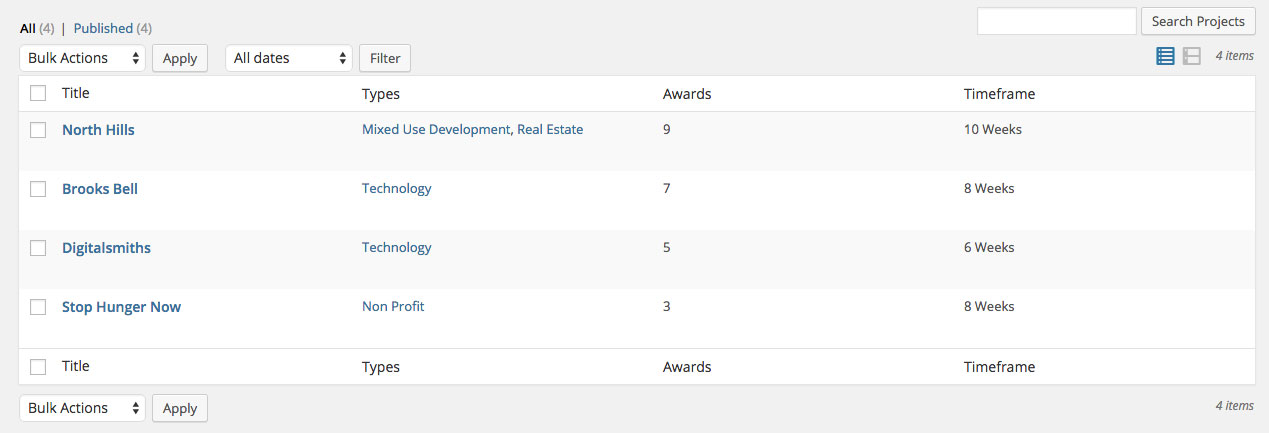
By default, when viewing a list of your posts in the Administration screen will give you the checkbox, the title, and the date published. When registering taxonomies to the post type, you’ll get an additional column for each additional taxonomy. For a majority of the cases, this is sufficient. But there may be an additional case or two where you need provide a little more information. For example, it may be good to reference pieces of meta data on the administration grid. Maybe you want a quick reference for the timeframe or awards field we defined above. We’ll need two functions for this attached to some WordPress hooks. Let’s look at the code.
function columns($columns) {
	unset($columns['date']);
	unset($columns['taxonomy-o3_project_attribute']);
	unset($columns['comments']);
	unset($columns['author']);
	return array_merge(
		$columns,
		array(
			'o3_awards' => 'Awards',
			'o3_timeframe' => 'Timeframe'
		));
}
The first line unsets the date column. You can unset any of the default columns that you wish. The second line unsets the custom taxonomy we registered (the tag-like one, not category). This could be useful for keeping the Admin screen neat and tidy. As you may have noticed, we also unset the comments and author – information we didn’t think was necessary on the screen.
Then we’re simply defining the new columns and merging it with the array that was passed in the function. We created two new columns, one for awards and one for timeline. The array keys are completely arbitrary here. They could be anything, but we’ll need to reference them again when it comes time to pull data into those columns… which is what we’re going to do next.
function column_data($column,$post_id) {
	switch($column) {
	case 'o3_awards' :
		echo get_post_meta($post_id,'awards',1);
		break;
	case 'o3_timeframe' :
		echo get_post_meta($post_id,'timeframe',1);
		break;
}
Alright, we fetched the meta data and conditionally output it based on what column we’re on. This is where we’re referencing the array key from above. So as long as they’re both the same, you could use any arbitrary string you want. Note that we’re pulling the meta fields over using the get_post_custom native WordPress function.
Sorting
Ah, sorting. As you probably know, WordPress sorts Pages by menu order and then alphabetically by title and Posts by date published. Let’s get fancy and sort our new post type by the number of awards won. The use case here is easy to see. You want your most award-winning work at the top of the list at all times. When you use standard WordPress queries, it’s going to honor the order we’re about to establish – universally across the website. We’ll need two functions here as well. One to join the wp_posts and wp_postmeta table and the second to revise how the data is being sorted.
function join($wp_join) {
	global $wpdb;
	if(get_query_var('post_type') == 'o3_project') {
		$wp_join .= " LEFT JOIN (
				SELECT post_id, meta_value as awards
				FROM $wpdb->postmeta
				WHERE meta_key =  'awards' ) AS meta
				ON $wpdb->posts.ID = meta.post_id ";
	}
	return ($wp_join);
}
This function does the joining for us. I’m not going to get into why that select statement works (that’s for another article altogether), but trust me it does. Pay attention to the if statement here. We’re determining the post type and then conditionally running the join if it meets the o3_project condition. Absent this if statement, you would be doing this join, regardless of type. Likely not something you want.
There could also be a case where you just want to sort the Administration screens, and not the front end. Fortunately, we can use the built-in WordPress conditional statements to do that job. Just wrap your statement with another conditional and check against is_admin.
function set_default_sort($orderby,&$query) {
	global $wpdb;
	if(get_query_var('post_type') == 'o3_project') {
		return "meta.awards DESC";
	}
 	return $orderby;
}
Once again, we’re verifying our post type and then returning an amended order statement. Now we’re telling WordPress to order by the value from the wp_postmeta table descending. So we’ll get a list of our awards from the most won per project to the least won per project.
Putting It All Together
Each of these functions won’t do anything until they’re called and attached to WordPress hooks. We’ll do this and keep it neat by creating an object around the post type and using the constructor to attach each function to the appropriate hook. For brevity, we’re not going to repeat the already referenced code.
class o3_project {

	function o3_project() {
		add_action('init',array($this,'create_post_type'));
		add_action('init',array($this,'create_taxonomies'));
		add_action('manage_o3_project_posts_columns',array($this,'columns'),10,2);
		add_action('manage_o3_project_posts_custom_column',array($this,'column_data'),11,2);
		add_filter('posts_join',array($this,'join'),10,1);
		add_filter('posts_orderby',array($this,'set_default_sort'),20,2);
	}

	function create_post_type() {
		...
	}

	function create_taxonomies() {
		...
	}

	function columns($columns) {
		...
	}

	function column_data($column,$post_id) {
		...
	}

	function join($wp_join) {
		...
	}

	function set_default_sort($orderby,&$query) {
		...
	}
}

new o3_project();
Voila. Everything comes together quite nicely. In our constructor, we reference the appropriate actions and filters. We perform these functions in a particular order – and this must be followed. The post type has to be created first. The taxonomies attached second. Then any sort of custom sorting. Keep that in mind as you’re creating your data type.
Summing Up
Once you get the hang of it and you create a few of these, it’ll start to come very naturally. I’ve got a bunch of these clips saved up and in my tool belt. I rarely create these from scratch anymore. Although this article is long and in-depth, it really is about a 10-minute process from concept to conclusion after you fully understand what’s going on.
If you find that you’re lost in the lingo, give us a shout. Let us see if we can help.